Documentation
Sasula SDK
Version : 1.0

Sasula Payment SDK by Culipa offers a quick way to integrate and start accepting digital payments on your website. Follow our easy guide below and have payments coming in within hours not days!
Including Style & Script :
Include the Style & Script below to on your checkout webpage’s html :
For the best performance, include these above any other scripts or style sheets.
<link href="https://test.pay.culipa.com/sdk/v1.0/assets/css/style.css" rel="stylesheet" type="text/css">
<script src="https://test.pay.culipa.com/sdk/v1.0/assets/js/script.js" ></script>
Form's Element :
Add a DOM container element on your checkout webpage’s html section where you’d like the Sasula Interface to be mounted and displayed. It’s advised to give the container element a descriptive id. In the example below, we use payment-form-parent
<div id="payment-form-parent"></div>
Note : This is the element where the payment form will get mounted.
Configuration
Create a configuration object to be used to initialize the Sasula payment instance. The example below sets a basic configuration to collect UGX 500 from a Mobile Money Wallet. The configuration is done within the webpage’s javascript.
Basic Configuration :
<script type="text/javascript">
    const config = {
        environment: 'TEST', // SDK environment, e.g. “TEST” to make test payments”
        amount: 50000, // Amount to be paid, e.g. UGX 500.00
        currency: 'UGX', // Amount currency
        merchant: 'YOUR_MERCHANT_NAME', // Enter your Merchant name
        sasulaToken: 'YOUR_SASULA_TOKEN', // Enter your Sasula token
        transactionID: 'YOUR_TRANSACTION_ID', // Enter your Transaction ID
        paymentMethod: 'MOBILE_WALLET', // [Optional] Payment method to be used
        onResult: (result) => { // Returns result
            //console.info(result);
        },
        onRequestPending: (status) => { // Returns result
            //console.warn(status);
        },
        onError: (error) => { // returns error(s)
            //console.error(error);
        },
    }
</script>
For the best performance, load this configuration at the bottom of your webpage.
Parameters :
Each parameter has a number of validations that govern the values they can accept. See this table to understand what’s accepted where.
| Name | Required | Values | Description |
|---|---|---|---|
| environment | Yes |
Type: Enum Accepted Values:
|
|
| amount | Yes |
Type: Integer
Minimum and maximum values are dependent on currency. |
The amount to be charged to the payment method in minor units (e.g. cents, pennies). This allows the amount to be region-agnostic and apply regardless of how thousand and decimal separators are expressed in different regions. Examples : - 50000 is 500.00 (€500,00 or $500.00) - 987654 is 9,876.54 (€9.876,54 or $9,876.54) |
| currency | Yes |
Type: String Supported Values:
|
ISO-3 Letter Currency Code for the amount to be paid. |
| merchant | Yes | Type: String | This is your unique Merchant String used to identify your merchant account under your business. |
| sasulaToken | Yes | Type: String | This is a bearer authentication token valid for 10 minutes. It is generated from the /getToken Culipa API. |
| transactionID | Yes |
Type: String
|
The Merchant’s transaction reference or ID that is used to identify the transaction on the merchant’s system. |
| paymentMethod | No |
Type: Enum Accepted Enums:
|
Enum for the required payment method. If not specified, the form will show all available options in a dropdown menu for your customers to choose. Specify specific methods for only that method to be displayed. |
Parameter Validations :
Each parameter has a number of validations that govern the values they can accept. See this table to understand what’s accepted where.
| Parameter | Validations |
|---|---|
| environment |
|
| amount |
|
| currency |
|
| merchant |
|
| sasulaToken |
|
| transactionID |
|
| paymentMethod |
|
Event Listeners :
Use the event listener callback methods below to execute code of your choice whenever specific events happen.
| Name | Parameters | Return | Example Returned Object |
|---|---|---|---|
| onResult | result | JSON Object of the payment request’s result |
|
| onRequestPending | status | JSON Object returned when a request is pending |
|
| onError | error | JSON Object returned when an error is encountered. |
|
onResult : Parameters & possible values
This table below describes the parameters returned in the onResult Object and their possible values.
| Name | Type | Description |
|---|---|---|
| message | string |
The message returned by SDK after the payment request. Below are some of possible values :
“Payment Successful!”
“Payment Refused! Please try again later!”
|
| name | string |
The name of the SDK request from which the message is returned. Below are some of possible values :
- request-payment-status
|
| stack | object | The stack object returns the Culipa Collection API JSON response, please take a look at the possible responses here (TBD) |
| type | string |
The type of request Below are the possible values :
- request-success
- request-refused
|
onRequestPending : Parameters & possible values
This table below describes the parameters returned in the onRequestPending Object and their possible values.
| Name | Type | Description |
|---|---|---|
| message | string |
The message returned by SDK after the payment request. Below are some of possible values :
“Check your 07xxxxxxxx phone and enter your pin to approve the payment”
|
| name | string |
The name of the SDK request from which the message is returned. Below are some of possible values :
- request-payment-status
|
| stack | object | The stack object returns the Culipa Collection API JSON response, please take a look at the possible responses here (TBD) |
| type | string |
The type of request Below are the possible values :
- request-pending
|
onError : Parameters & possible values
This table below describes the parameters returned in the onError Object and their possible values.
| Name | Type | Description |
|---|---|---|
| message | string |
The message returned by SDK after the payment request. Below are some of possible values :
- Request Error Messages
“Something went wrong, please check your sasula config!”
“Payment Failed! Something went wrong!”
“Payment Failed! Something went wrong, please check your sasula config!”
- Field Error Messages
“mobileMoneyNumber:
- The mobile money number field is required.” “mobileMoneyNumber:
- The mobile money number must be 10 digits.” etc..
|
| name | string |
The name of the SDK request from which the message is returned. Below are some of possible values :
- Request Names
- request-payment-form
- request-payment
- request-payment-status
- Field Names (Form fields)
- paymentMethod
- countryCode
- mobileMoneyNumber
- Field Names (Config fields)
- environment
- amount
- currency
- merchant
- sasulaToken
- transactionID
- paymentMethod
|
| stack | object | The stack object returns the Culipa Collection API JSON response, please take a look at the possible responses here (TBD) |
| type | string |
The type of request Below are the possible values :
- request-error
- field-error
|
Show/Hide Sasula Payment Form :
After the configuration has been set, initialize a Sasula object/instance with the above set configuration within the same script body as the configuration.
This will allow you to mount / unmount the payment form UI onto the DOM element you’ve specified, at the time of your choosing. In this example below we’re mounting the form to the payment-form-parent DOM element.
<script type="text/javascript">
// SDK Instance
let sasulaInstance = new Sasula(config);
sasulaInstance.mount('#payment-form-parent'); // Mount to your DOM Element
</script>
Note : If your configuration is not done properly, the returned instance will be empty and unable to mount / unmount the form.
Mount/Unmount Method :
The mount and unmount methods on the sasula object allow you to show or hide the Payment form UI whenever you need to.
If your configuration is not done properly, the returned instance will be empty and unable to mount / unmount the form.
| Name | Description | Example |
|---|---|---|
| mount() | Mounts and displays the payment form onto the div. |
|
| unmount() | Unmounts and removes the payment form from the div. |
|
Note : SDK instance & mount() example is also at the Basic Configuration section.
Example Integration
- Setup :
<html>
<head>
<link href="https://test.pay.culipa.com/sdk/v1.0/assets/css/style.css" rel="stylesheet" type="text/css">
<script src="https://test.pay.culipa.com/sdk/v1.0/assets/js/script.js"></script>
<head>
<body>
<!-- Form will get mounted inside below div -->
<div id="payment-form-parent"></div>
</body>
</html>
<script type="text/javascript">
const config = {
environment: 'TEST',
amount: 10000000, // 100,000
currency: 'UGX', // Amount currency
merchant: 'amazonUganda', // Enter your Merchant name
sasulaToken: '783y2bf3i7qe6e7.ey893dnh892hshy241y29dn0cu2rf8nb', // Enter your Sasula token
transactionID: 'order2022-12-31-283', // Enter your Transaction ID
paymentMethod: 'MOBILE_WALLET', // Payment method to be used
// Callbacks
onResult: (result) => {
processResult(result); // Method to process the returned result object
},
onRequestPending: (status) => {
// Code to do whatever your website needs to do while the payment is pending
},
onError: (error) => {
logError(error); // Method to log your errors
}
}
// SDK Instance
let sasulaInstance = new Sasula(config);
sasulaInstance.mount('#payment-form-parent'); // Mount payment form
</script>
Implement a similar setup as above, replacing the respective parameter values with those from your Culipa account and with the required
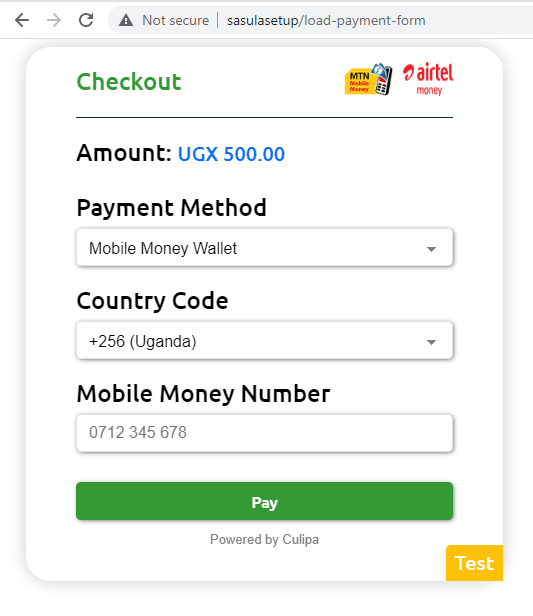
After your implementation, load your webpage in a browser & you should see the payment form as below..
Introduction :
After the successful Setup & mounting, the form will be generated on the webpage. Using the form Payment can be done. Select and enter valid details in the form & click on the Pay button, after some time popup message will appear as per the SDK response, mainly there are 4 types of popup messages :
- Pending : Payment request is pending.
- Success : Payment successfully made.
- Error : Some errors occurred during payment.
- Refused : Payment request has been refused.
Fields :
| Name | Required | Values | Description |
|---|---|---|---|
| Payment Method | Yes |
|
Select Payment Method by which payment will be done. |
| Country Code | Yes |
|
Select the Country Code of your Mobile Money Number. |
| Mobile Money Number | Yes |
|
Enter your 10 digit Mobile Money Number. |
Field Validations :
| Field | Validations |
|---|---|
| Payment Method |
|
| Country Code |
|
| Country Code |
|
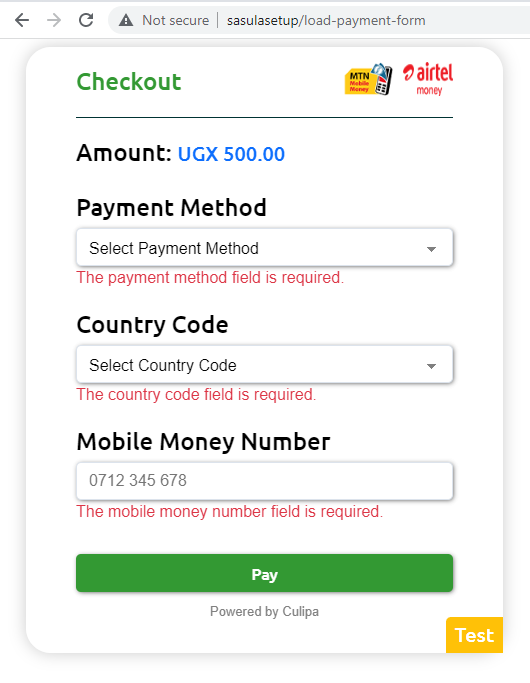
Validation Example :
Our default payment form design and size might not be the best fit for your website’s colors, look and feel. If you’d like to customize the form to better match your needs, please review this guide.
Customization Steps :
- Download the .css file from this link
-
Store the downloaded file inside your project’s folder.
- - Example : “your-project-folder/css/style.css”
-
Include the new downloaded .css file as described
-
- Example :
<link href="your-protocol://your-host/path-to-css/your-downloaded-style.css" rel="stylesheet" type="text/css"> <script src="https://test.pay.culipa.com/sdk/v1.0/assets/js/script.js" ></script> -
Replace these with your own :
- - “your-protocol” : Set your project’s protocol (http/https)
- - “your-host” : Set your host name.
- - “path-to-css” : Set your path to css folder.
- - “your-downloaded-style.css” : Set your downloaded .css files name & extension.
- - Remove the include part of the main SDK’s .css file
- - Keep the script.js including part as it is.
-
- Example :
- Modify your .css file as per your business’ needs below :
The easiest way to kick off your customization is by using our css variables below :
CSS variables : Simple way to Personalize
- Variables :
| Name | Category | Description |
|---|---|---|
| --sasula-green-color | general | The green color as per Culipa’s theme. |
| --sasula-success-color | success | Success message box font color |
| --sasula-success-background | success | Success message box background color |
| --sasula-warning-color | warning | Warning message box font color |
| --sasula-warning-background | warning | Warning message box background color |
| --sasula-error-color | error | Error message box font color |
| --sasula-error-background | error | Error message box background color |
| --sasula-form-font-size | form | Form font size |
| --sasula-form-font-family | form | Form font family |
| --sasula-form-border | form | Form border |
| --sasula-form-background-image | form | Form background image |
| --sasula-form-background-color | form | Form background color |
| --sasula-form-background-border-radius | form | Form background border radius |
| --sasula-form-background-box-shadow | form | Form background box shadow |
| --sasula-form-title-font-size | form-title | Form title font size |
| --sasula-form-title-font-color | form-title | Form title font color |
| --sasula-form-title-border-bottom | form-title | Form title border at bottom |
| --sasula-form-field-title-font-size | form-field | Form field title font size |
| --sasula-form-field-title-font-color | form-field | Form field title font color |
| --sasula-form-field-background-color | form-field | Form field background color |
| --sasula-form-field-font-color | form-field | Form field font color |
| --sasula-form-field-font-size | form-field | Form field font size |
| --sasula-form-field-placeholder-color | form-field | Form field placeholder color |
| --sasula-form-field-border | form-field | Form field border |
| --sasula-form-field-box-shadow | form-field | Form field box shadow |
| --sasula-form-amount-font-size | amount | Amount label font size on the form |
| --sasula-form-amount-font-color | amount | Amount label font color on form |
| --sasula-form-pay-button-background-color | pay-button | ‘Pay’ button background color |
| --sasula-form-pay-button-hover-background-color | pay-button | ‘Pay’ button hover background color |
| --sasula-form-pay-button-font-color | pay-button | ‘Pay’ button font color |
| --sasula-form-pay-button-border | pay-button | ‘Pay’ button border |
| --sasula-form-pay-button-box-shadow | pay-button | ‘Pay’ button box shadow |
| --sasula-form-powered-by-culipa-font-color | powered-by-culipa | ‘Powered by culipa’ font color |
| --sasula-form-powered-by-culipa-font-size | powered-by-culipa | ‘Powered by culipa’ font size |
| --sasula-form-env-test-info-background-color | env-test-info | TEST Environment information background color |
| --sasula-form-env-test-info-font-color | env-test-info | TEST Environment information font color |
| --sasula-form-env-test-info-font-size | env-test-info | TEST Environment information font size |
| --sasula-form-payment-icon-section-display | payment-icon | Payment icons section at the top right side |
| --sasula-form-payment-icon-mtn-display | payment-icon | MTN MoMo payment icon display |
| --sasula-form-payment-icon-airtel-display | payment-icon | Airtel Money payment icon display |
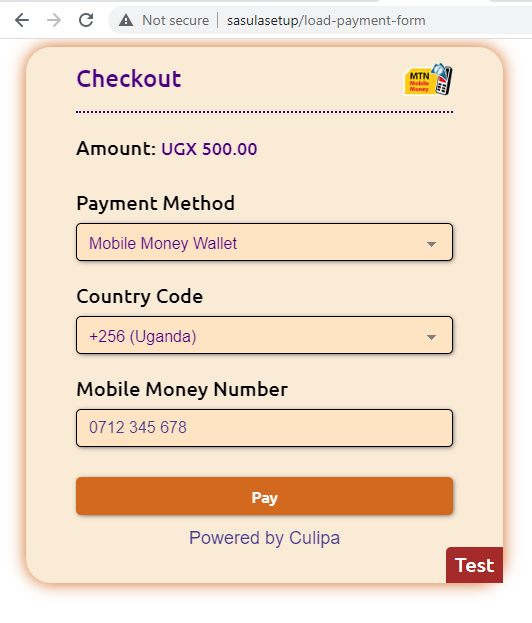
Below is an example CSS variable customization. Apply these changes to the .css file & refresh the webpage where form is being loaded.
- Example : Changes
/*form*/
--sasula-form-background-color: AntiqueWhite;
--sasula-form-background-box-shadow: 0 0 1rem 0 Chocolate;
/*form-title*/
--sasula-form-title-font-color: Indigo;
--sasula-form-title-border-bottom: 2px dotted Indigo;
/*form-field*/
--sasula-form-field-background-color: Bisque;
--sasula-form-field-font-color: Indigo;
--sasula-form-field-placeholder-color: DarkSlateBlue;
--sasula-form-field-border: 1px solid #000000;
/*amount*/
--sasula-form-amount-font-color: Indigo;
/*pay-button*/
--sasula-form-pay-button-background-color: Chocolate;
--sasula-form-pay-button-hover-background-color: teal;
--sasula-form-pay-button-font-color: #fff;
--sasula-form-pay-button-border: 0px solid black;
/*powered-by-culipa*/
--sasula-form-powered-by-culipa-font-color: DarkSlateBlue;
--sasula-form-powered-by-culipa-font-size: 18px;
/*env-test-info*/
--sasula-form-env-test-info-background-size: Brown;
--sasula-form-env-test-info-font-color: White;
--sasula-form-env-test-info-font-size: 1.25rem;
/*payment-icon*/
--sasula-form-payment-icon-section-display: ;
--sasula-form-payment-icon-mtn-display: ;
--sasula-form-payment-icon-airtel-display: none; /*hide AIRTEL icon*/
- Example : Updated Form
After applying above changes & refreshing webpage, the Form should look like this :
All set? Load your checkout webpage where the Payment form UI is mounted. Select the payment method and then enter the payment method’s required payment details and click pay.
Read on, to see how to test specific payment scenarios/results.
Make Payment
If the selected payment method requires additional steps outside the website. For example, with Mobile Money, you will see the Pending pop like below. The pop up box will provide steps to follow to complete the payment outside of the website.
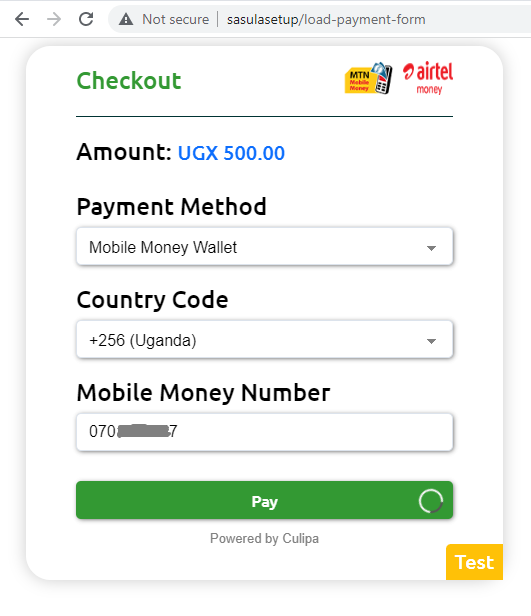
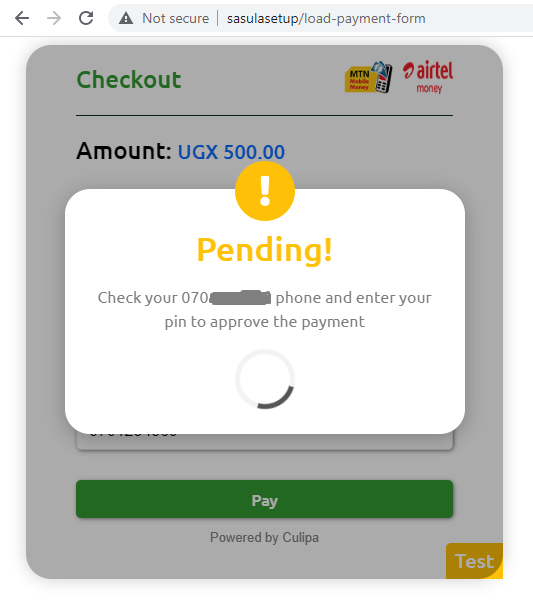
Pending Request

Payment Success
If the payment is successful after, a pop-up like this will be displayed.
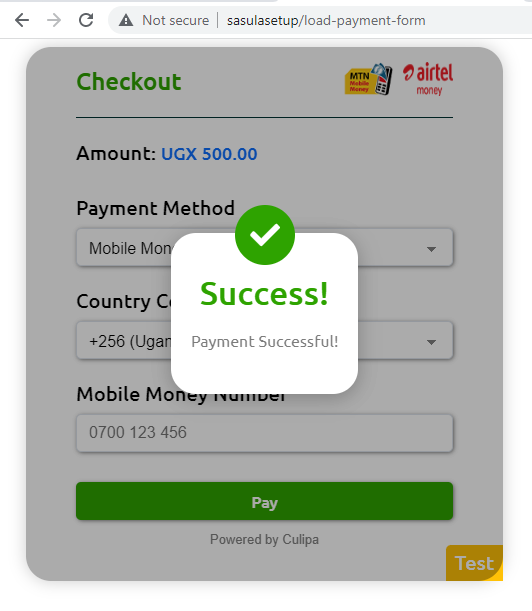
The pop-up will get closed after 5 seconds & the form will be ready to perform another payment.
Additionally, the following result JSON object will be returned via the onResult event listener.
{
    message: "Payment Successful!",
    name: "request-payment-status",
    stack: {
        amount: 50000,
        collectFrom: {
            account: "70xxxxxxx",
            country: "UG",
            paymentMethod: "wallet",
        },
        culipaTxID: "I1Q0xxxxxxxxxxx",
        currency: "UGX",
        status: "SETTLED",
        transactionID: "TIDxxxxx",
    },
    type: "request-success",
}
Use the following Test Payment Method details to trigger a successful response.
Payment Method
Trigger Test Success with
Instructions
Mobile Money Wallet
(Uganda)0700123456
0750123456
0772123456
0780123456You will see a pending pop-up for 15
seconds instructing you to approve
the payment on the phone. You can
ignore this instruction. The pop-up
will show success after 15 seconds.
Payment Error
In case an error is encountered communicating to Culipa or to the payment method network, this error pop-up will be displayed. The error details will be shared over the event listener so you can respond as required.
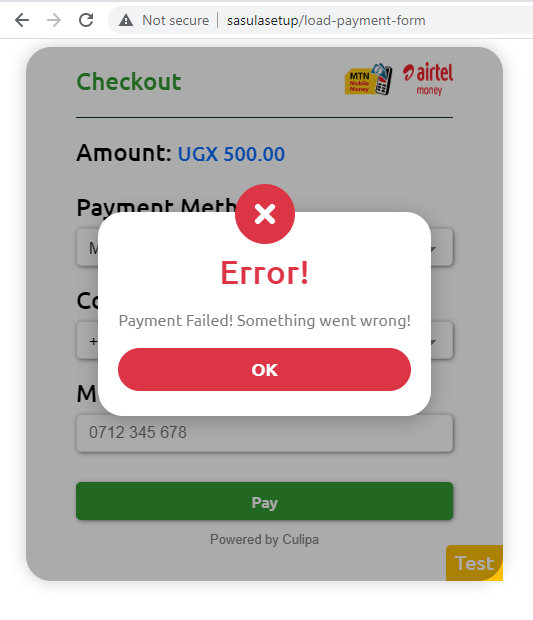
Clicking ‘OK’ closes the pop-up box & the form will be ready to perform another payment.
To trigger a test error response, you can use the following payment method details
Payment Method
Trigger Test Error with
Instructions
Mobile Money Wallet
(Uganda)0700000000
0750000000
0772000000
0780000000You will see the error pop-up
show up immediately.
Payment Refused
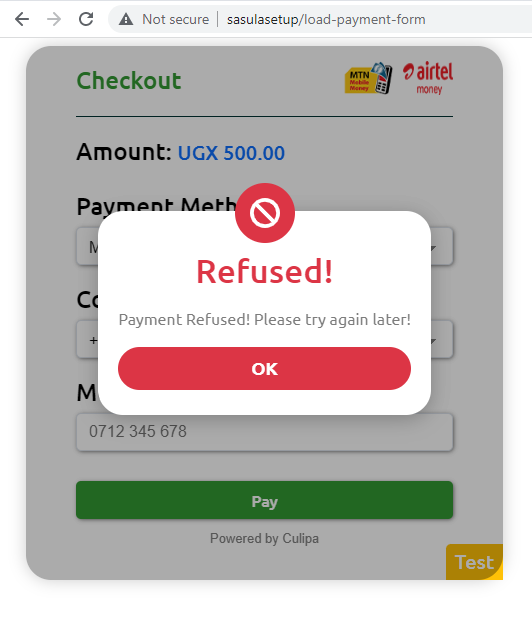
Clicking ‘OK’ closes the pop-up box & the form will be ready to perform another payment.
To trigger a test refusal response, you can use the following payment method details
Payment Method
Trigger Test Error with
Instructions
Mobile Money Wallet
(Uganda)0700222222
0750222222
0772222222
0780222222You will see a pending pop-up
for 15 seconds instructing you
to approve the payment on
the phone. You can ignore
this instruction. The pop-up
will show refused after 15
seconds.
Key points to note :
| Point | Description |
|---|---|
| One request at a time per form |
Click on Pay button :
|
| Don’t refresh when request is in progress |
On Payment request is in progress :
|
| Some number patterns & their return value |
Number ends with six Zeros (0) :
Number ends with six Twos (2) :
Number ends with six Nines (9) :
|